Instruction Manual
This user manual provides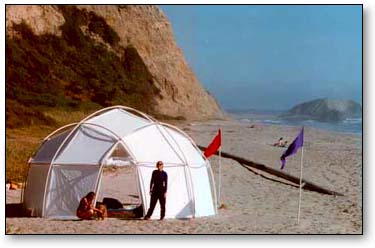 important information and instructions for dome assembly and disassembly, site selection, anchoring, controlling inside environment, storage, repair, and accessories. This manual applies to all Shelter Systems’ domes, yurts, and greenhouses, but for simplicity here they are all referred to as “domes”.
Before you begin to assemble your dome, you should read this manual carefully and also watch our set-up video
Our manual is available as a pdf document here
SAFETY WARNING: Always wear eye protection and gloves, and make sure bystanders are a safe distance away when assembling, disassembling, or modifying your dome!
DO NOT COVER SHELTER WITH A TARP, PARACHUTE OR ANYTHING OTHER THAN A SINGLE LAYER OFa POROUS SUNSHADE! A tarp can fill with rain or snow and collapse your shelter. A tarp will trap heat and cause the poles to deform. Do not overlap sunshades.
WARNING ABOUT USING A STOVE IN YOUR DOME: Do not make your dome airtight as you could suffocate. To prevent carbon monoxide poisoning do not use any fuel consuming appliances, heaters or stoves without venting the fumes to the outside of your dome. Leave a crack in your door as combustion devices consume oxygen.
SNOW WARNING: For use of your dome in snow, accumulated snow must be melted or shaken off periodically. Accumulated snow could collapse your dome, damaging what you have stored inside or compromising your shelter. Still have questions about your Shelter Systems dome? Call our customer service line and we will be happy to help you: Toll Free 866-777-1066 or 831-464-2002
© 1996 – 2011 Shelter Systems All Rights Reserved.
Parts included With Your Dome:
Your dome purchase comes with all the required parts to assemble and to be fully functional:
- Dome canopy
- Dome poles
- Stakes (plus 4 extra)
- Strings for stakes
- Manual
- Vent tubes
- Binder clips to secure doors
- Guy lines
- Spare parts
Additional Accessories Offered by Shelter Systems
In order to help you make the most of your Shelter Systems dome, we offer a variety of accessories and add-ons.
Where cooling and shade are needed we have found that our standard shelters with attached porous “sunshades” https://shelter-systems.com/accessories.html works very well: Since our shelter’s poles are spaced well above the shelter’s covering, an attached external sun shade will block the sun and at the same time provides ample space underneath the poles for air flow to cool the sunshade and prevent the sun heated shade from radiating the absorbed heat into the shelter. We have tested this under summer desert conditions with doors open and found that the inside temperatures closely approach the shaded outside ones.
Site Selection:
Carefully select a site for your dome. A good site can make the difference between a wonderful stay and a miserable one. You should consider drainage, leveling, wind protection, sun and shade, and make sure you dome is not under a tree or branch that can fall on you.
Drainage:
Ideal drainage occurs when rainwater can flow down and away from your dome, such as on a raised site or hilltop. If you choose to place your dome in a meadow or a place that does not drain well, create a small mound of earth for your dome to sit on to raise it. An effective mound will be about 1-foot high and have sloped sides so rain water runs away from the edge of your dome.
Leveling:
If your dome site is sloped, you should create a level place big enough for your yurt dome with proper drainage. Mark out a circle on your site big enough for your dome and clear the area of trees, large rocks, roots, and other debris. To make your site level, move the dirt from the uphill side of your site to the downhill half. To create proper drainage, dig a ditch of at least 6” on the uphill edge of your site to allow rain to drain into the ditch and not right under your dome. As described in the previous section (“Drainage”), slope the earth at the outside edges of your site should be sloped for best drainage.
Use of your dome in sites with strong wind:
For the materials used, Shelter Systems’ domes are stronger than any other structure, but they are lightweight portable structures, so caution needs to be taken in strong wind. Extreme wind sites are not recommended. If possible avoid exposed hilltops and narrow valleys, as wind speeds usually increase in there, and choose a site with trees or brush to protect your shelter from wind. If you do not have natural protection between your structure and a strong wind, you can create a barrier, for example with straw bales.
 Constant wind will shorten the life of your structure and strong gusts can damage the covering or rip clips from the cover. If your dome is free from its anchors it can tumble and blow away and possibly collide and damage people or property. Do not let your dome get away from you and anchor it well. Even if you anchor your dome well, extreme wind can rip the guy line clips and poles off your dome and your dome will fail. For more on anchoring your dome, see “Anchoring” section below.
Use of your dome in the snow: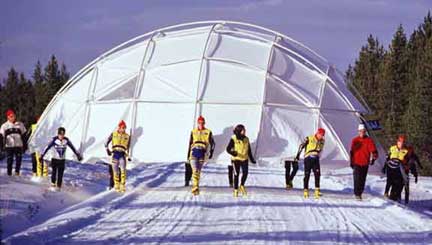
Shelter Systems’ domes have been used very successfully in the snow, but caution needs to be taken to prevent build-up of snow on the dome covering. Just as you would not expect to be able to climb up on top of your dome and have it hold you, your dome will not support much snow. If you plan to use your dome in the snow you will need to knock off the snow periodically or melt it off with heat from within the dome. If the dome should collapse some poles may break, usually with little or no damage to the covering, but some items stored inside the dome could be damaged by the weight or melting of snow once your dome has collapsed. Poles are easy to repair and inexpensive to replace (we sell replacement poles for all our domes.
Extreme weather warning: Your Yurt Dome shelter could be destroyed in extreme weather and your life or safety could be at risk. In heavy snow or wind your Yurt Dome could collapse, damaging what you have or compromising your shelter. Do not rely on your Yurt Dome as your only shelter. Accumulated snow must be melted or shaken off periodically
Warning about covering your dome: DO NOT COVER SHELTER WITH A TARP, PARACHUTE OR ANYTHING OTHER THAN A SINGLE LAYER OF SUNSHADE! A tarp can fill with rain or snow and collapse your shelter. A tarp will trap heat and cause the poles to deform. Do not overlap sunshades.
Dome assembly and disassembly: Always wear eye protection and gloves for safety!!
Assembly:
Assembling your dome takes some coordination, and it is easier with two people, so you may want to have a friend help you the first time. Over time, your covering and poles will adjust slightly to fit each other better, plus you will become more comfortable putting up your dome, making your dome much easier to assemble the next time.
For all our domes, you will start by adding poles from the top down towards the base. When you reach the triangular windows add three short poles to each of the window before adding the last remaining long poles. You can fine tune the pole arches of your dome by disconnecting poles that seems to bend excessively outward and then rearranging and reconnecting the poles so that over stressed poles lie outward from the poles they cross.
Tips for bending poles: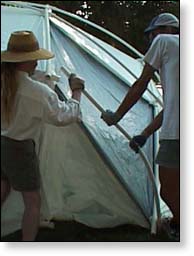
In order to insert the poles into the connectors attached to the covering, you have to slightly bend the poles. This can be a bit tricky at first, and is easier with two people until you become more comfortable with the technique.
To get a pole to bend, fit one end of it on to a connector, then grab the pole in the center and pull outward from the dome, and push the other end inward. One technique is to insert a leg between the dome and pole in order to use your body weight to help bend the pole. Another is to use the lower connectors as a lever to pry the pole into it. Once the pole is slightly bent, you should be able to insert the free end into the next connector, stretching the dome covering underneath the pole.
Be careful not to bend the pole too much, or it will kink. Your dome does come with 4 extra poles, so if one does kink, you will still have enough poles to complete you dome. Shelter Systems sells replacement poles for all our domes.
Assembling 10′, 14′, 18′, and 20′ domes:
 Start by organizing your dome parts. Set aside the short poles from you pole set, and place the long poles close-by.
- Spread the dome on top of your floor or a large tarp so that the dome’s connectors are visible and the top of the dome (marked with a strip of fabric) is in the middle. Take care that your dome’s covering is not pinched between your domes poles or connectors and any hard surface (such as concrete, asphalt or rocks), which can cause rips or cuts in the dome’s covering. It’s best to set up your dome on a soft surface, such as on grass or soft dirt, but if you must set it up on a hard surface, at all times, keep the covering tucked under the dome away from the thrust of the poles.
- Working from the center (will be top) out, work add one pole at a time. Insert a pole into the connector at the top of the dome; insert the other end of the pole into a connector outward from the center. You now should have an X.
- Insert the next three long poles from the center outward. You should now have formed an X at the top of the dome such that there should only be a little slack in the covering under the poles.
- Continue bending and inserting long poles working out and down from the top. Note: it does not matter which connector is on top and which is underneath;random is best; however if the poles seem unusually tight you might try switching the order of the connectors. As more poles are added, the canopy will become tighter requiring that you bend the poles and pull on the connectors to fit the poles in place. (see “Tips for bending poles” above).
Assembling 8′ and 11′ GroDomes:
The 8’ and 11’ GroDomes are assembled similarly, except they use three-way “Y” connectors. As with assembly of all Shelter Systems’ domes, start with the top and work down.
Assembling BubbleDomes:
Assembling your BubbleDome (if you ordered a bubble dome) is very similar to the 10’, 14’, 18’, and 20’ standard domes. The bubble dome has only one door. Extra poles are added in order to make a “bubble” shape. You will add 12 poles to make a horizontal ring. Then add 12 of poles vertically, which will curve slightly inwards, making the dome into its “bubble” shape.
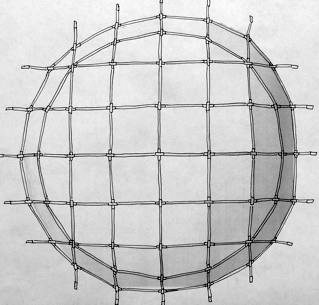
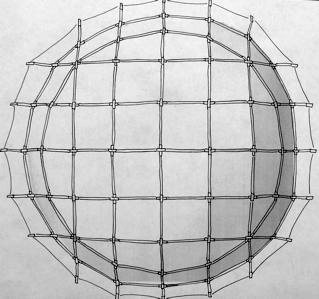
Assembling 30′ and 31′ domes:
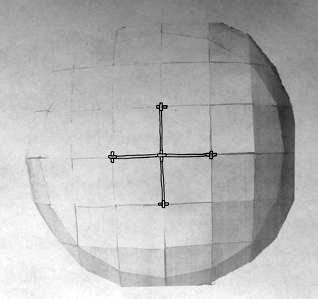
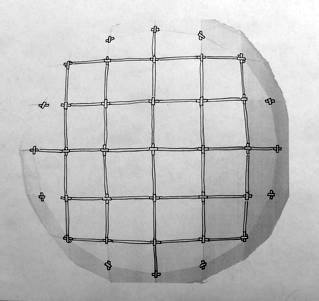
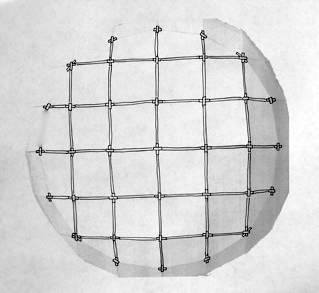
The 30’ and 31’ domes are the hardest of our domes to put up. You should have at least two strong people working together to set up these domes; at least till you master the setup. Note: it does not matter which connector is on top and which is underneath; random is best; however if the poles seem unusually tight you might try switching the order of the connectors. As more poles are added, the canopy will become tighter requiring that you bend the poles and pull on the connectors to fit the poles in place. See the drawings on the next page for a ‘bird’s eye view’ of dome assembly.
- Start by organizing your dome parts. Set aside the poles in two piles according to size.
- Spread the dome on top of your floor or a large tarp so that the dome’s connectors are visible and the top of the dome (marked with a strip of fabric) is in the middle. Take care that your dome’s covering is not pinched between your domes poles or connectors and any hard surface (such as concrete, asphalt or rocks), which can cause rips or cuts in the dome’s covering. It’s best to set up your dome on a soft surface, such as on grass or soft dirt, but if you must set it up on a hard surface, at all times, keep the covering tucked under the dome away from the thrust of the poles.
- Working from the center (will be top) out, work with one pole at a time. Insert a pole into the connector at the top of the dome; bend the pole slightly and insert the other end of the pole into a connector outward from the center.
- Insert the next three long poles from the center outward. You should now have formed an X at the top of the dome such that there should only be a little slack in the covering under the poles.
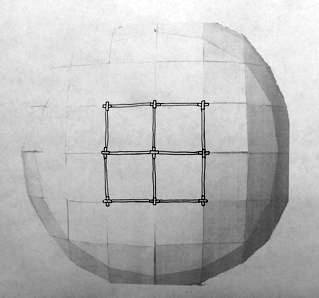
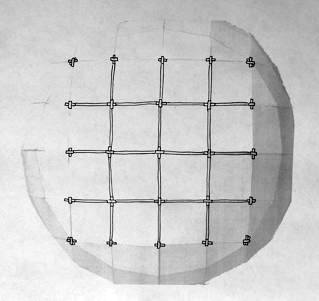
- Continue bending and inserting long poles working out and down from the top. Start by adding to the X to make a 2×2 square (4 squares). Then add 24 more poles to make a 4×4 grid (16 squares).
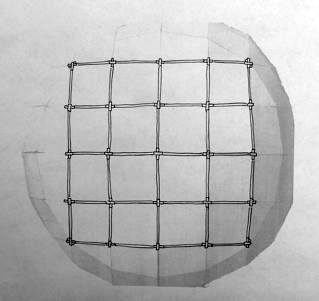
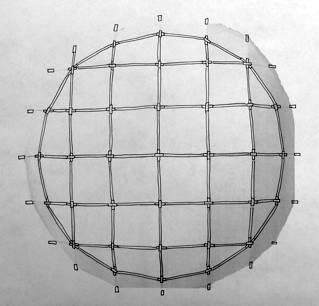
- From here, the next row of poles you add will be to form diamonds and 12 triangles. This is best understood by looking at the diagram below. The short poles fit on one side of each triangle. The right size poles will only fit where they belong – when inserted in the right connectors, they will make the covering taught.
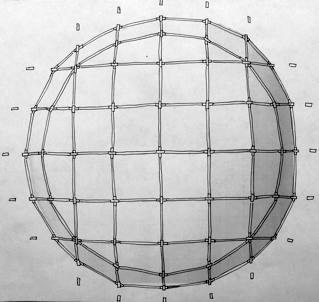
You now have a completed 30’ dome. For the 31’ dome, you add one more ring and one more row of vertical poles of standard poles.

Positioning your dom
After all poles are in, move your dome where you want it, and rotate your dome so the doors face the direction you want. When you are ready to anchor your dome in place, first close and latch all the doors. The dome holds better shape when the doors are closed, making a more perfect circle while you are staking it in place. See next section on anchoring your dome.
Putting Up Your Dome In Cold Weather:
Your dome’s poles are made of PVC, a thermo plastic, which gets stiffer when cold. Because assembling a dome requires slight bending of the poles, it is preferable to do this in the daytime when air temperatures are warmer. You can warm cold poles by wrapping them in a blanket or sleeping bag with many bottles of very hot water. In very cold weather, if you do not pre-warm your poles it is possible for some to break, but since each dome comes with 4 extra poles, you should still be able to complete your dome.
This may look complicated but the simple fact that you can not place a pole where there is no connector allows the construction of the dome to be a matter of adding one pole at a time while continuing to work out from the top center of the dome. You can not fit a long pole where a short one is to go as there is not enough covering under the connectors to allow it to fit.
Disassembly:
Disassembling your dome is the same but in reverse. Start by removing lower-most poles, and work upwards toward the top/center. Safety warning: always wear eye protection and gloves, and make sure bystanders are a safe distance from the dome!
Anchoring your dome: 
Anchoring: Always wear gloves and eye protection for safety! Your dome is no stronger than its anchors, so it is important to anchor it securely. Keep in mind these tips:
• On the clips at the base of your domes, there are small loops of cord (“stake loops”) attached, which are to be used for staking. When driving in stakes, orient the stakes such that the hook is facing away from the dome so that the cord is latched into the hook, otherwise in wind the cord loops could just slip off and the dome will not be anchored.
• To assure the dome’s edge is a tight and even circle, first drive stakes partway at every other pole base, and then go around pulling, tightening, and adjusting the circle. Once you have a tight and even circle, add a stake to every pole base, and drive all stakes deep.
• Be wind wise! The safest bet is to choose a site for your dome that is protected from wind. If that’s not possible, set up your tent at a time when the wind is least strong. Next best is to protect your dome site with barriers, such as hay bales, cars, a snow fence, buildings, etc.
• Even though the dome is freestanding and does not need to be staked out in order to stand, you should always stake it down as soon as you put it up. An unexpected gust of wind can grab the dome out of your hands. If you must put up your dome in the wind, have 4 or more friends hold the dome against the wind. Have them hold a clip cord, not a pole, as the pole could be pulled out of the connectors and the dome could be blown away out of your hands.
• Check your stakes and cords frequently! Ground conditions can change when wet. Wind over time will cause vibration and the tent to move up and down and side-to-side, causing your cords to wiggle loose or to be frayed by friction.
• To anchor your dome to a deck, use eye bolts attached to the 2″x 6″ boards set below the level of the deck. Make sure your deck is anchored to the earth.
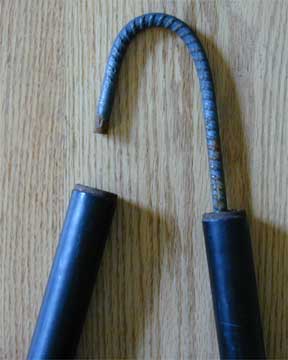
• If you use re-bar as stakes, make sure the ends of the re-bar are covered with bottles or tennis balls, or preferably bent into a “U” shape so you will not cut your foot or leg on the exposed bar. Rebar is very ruff and can cut through the dome’s stake loops. Replace your stake loops with 3/8″ nylon cord and check often for wear.
All structures, including our domes, will fail if the wind is strong enough, no matter how they are tied down. Size is important: a larger dome has a larger surface area and will catch more wind, so it must stronger and tied down tighter. Our domes hold up well in most storms. Our strongest domes are the 10′, 18′, and 30′ domes. In some instances, your dome may still fail. Usually, only some poles will break (these are PCV, which are easy to repair and cheap to replace), and your dome can be put back up once the storm passes. If you have advance warning that a storm is coming, you can remove the lowest level of poles, then re-secure your shorten dome to the ground. This is reducing the surface area available for the wind to catch, making your dome more streamlined and thus able to withstand stronger gusts of wind.
Stakes: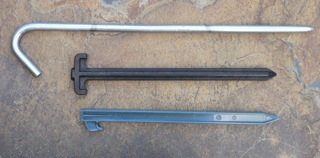 Your dome comes with a complete set of our standard stakes. These stakes are sufficient for most soils, but for some soils, you should consider stronger stakes. Always wear eye protection when driving or removing stakes. Stakes can shatter and cause serious injury to you or bystanders.
Standard Stakes: All our domes come with a complete set of stakes made of high-impact ABS. They are 12″ long and have excellent holding power in most soils. Drive the stakes thru the stake loop cords attached to the base clips of your dome such that the hook points away from dome and deep enough so that the hook so it enters the ground a short distance away from the dome and the stake cord is taught.
ExtraStrong Stakes: These almost indestructible 12″ stakes are highly recommended for hard, dry or compacted soils. Made from high impact glass filled resin. Drive the stakes thru the stake loop cords attached to the base clips of your dome such that the hook points away from dome and deep enough so that the hook so it enters the ground a short distance away from the dome and the stake cord is taught.
SuperStakes:
Super strong 18″ galvanized steel stakes for extra holding power or soil with some rocks. Drive the stakes thru the stake loop cords attached to the base clips of your dome such that the hook points away from dome and deep enough so that the hook so it enters the ground a short distance away from the dome and the stake cord is taught. To remove a SuperStake, slip another stake under the hook and lever the stake free.
Rebar Stakes:
Making your own rebar stakes:
You can make re-bar stakes by bending lengths of rebar into a U shape at the top of the stake. Slip 3’-4’ sections of steel pipe over the ends of rebar, pull on the ends of the pipes to bend the bar. The top end of the stake should be about 2”.
Avoiding rebar friction:
Strong wind pushing and pulling on the dome will cause the stake cord to rub up and down on the ruff rebar (like a saw blade), and the friction will eventually cut through the cord. The way around this is to tie the base clip cords to the re- bar with sections of 3/8″ or thicker cord. (The clip cords that we provide with our domes are only 1/8″ and are designed for plastic stakes, not re-bar).
Foundation Stakes for Soft or Rocky Ground
Another way to create longer and much stronger stakes is by using foundation stakes. You can buy foundation stakes from a building supply store, along with galvanized steel wire, ¼” nylon cord, and plastic end caps for the stakes. Foundation stakes are available in lengths from 18-inches to 4-feet. Longer stakes will ultimately be stronger.
Use pliers to create a loop of wire though the hole at the top of the stake. You have to do this because
foundation stakes do not have a big enough hole for you to thread cord through. Twist and bend together the ends of the wire so they will not cut you or the cord. Use a smalls sledge hammer to drive the stake into the ground until only the top 4″ is protruding. Use the 1/4″ cord to tie the wire to your dome’s bottom clip cords. Make sure you now use the plastic cap to protect the stake’s top, as it can do a lot of harm to your feet or be a tripping hazard. If you don’t have plastic caps, you can use an empty plastic bottle, empty soda can, or a tennis ball.
Anchoring Your Dome in Sand
In Sand anchor with what is called “dead man anchors”. This is done by burying in the sand a section of a log about 6″ in diameter and 2′ long that has a length of rot-proof rope attached to the center of the log. Pull up hard on the rope and make sure you cannot lift the log. If you can, the dome will not be anchored securely enough for windy conditions, so bury the log deeper. You should put up the dome first on a windless day if possible and set it were you want it, to locate and mark where the 12 anchors should be buried. Move the dome out of the way and bury your anchors, then place and secure your dome.
Anchoring your dome in rocky ground:
Always wear gloves and eye protection. First make a hole for your stake using rebar or a spike. With a one-foot of rebar stake, or a 10” to 12” “spike” (a very large nail) and a heavy-headed hammer, pound the rebar or spike into the ground. Before the rebar or spike is buried, loosen it with the hammer by hitting on the side that’s above the ground. Now pull the rebar out and pound in the stake.
If all you have are rocks (if you do not have stakes), use a heavy cord (at least 3/8″) to run from the dome’s 12 anchor clips to 12 large rocks. Then pile up additional rocks on top of these for additional anchor. More rocks are always better than less.
Anchoring Your Dome on Asphalt 
If you can drive steel stakes into the asphalt, then use the instructions above in the manual for staking using “foundation stakes”. If that’s not allowed or possible, use large water containers (for example 55-gallon plastic drums) as anchors at each of the domes lower anchor clips (12 drums on the 14′, 18′ and 20′ domes; 20 drums on the 30′ and 31′ domes).
1. Attach 3′ by 3′ sections of tarp to the bottom Grip Clips of the dome with a heavy duty Grip Clip (when attaching this Heavy Duty Clip – layer in 3 additional 10″ by 10″ patch layers of tarp – this added thickness should assure that the Grip Clip you are attaching does not slip on the tarp sections).
2. Check to see that the clip does not slip.
3. Set the empty drums over these attached tarps and then fill the drums with water. Test to see that you can not pull the tarp out from under the drums.
4. Tie these clips securely to the dome’s anchor clips.
5. In addition, run a rope through the two opening at the top of the drums and tie this to clip cords above the top of the drum as guys.
The dome may be held down with a sufficient number of sand bags tied to the domes anchor clips and also weighing down the dome’s skirt, but this will require a very large number of bags. Rubber mats that are commonly placed under rugs to keep rugs from sliding around can be used to provide friction and prevent sandbags from sliding out of place. You should use rubber mats in this order (from ground up): ground, rubber mat, tent skirt, rubber mat, sandbag.
Do not underestimate the strength of wind! If you can move the anchor clips they are NOT secure and your dome could blow away or cause damage.
Using Guy Lines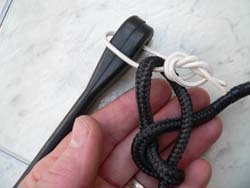
All Shelter Systems’ domes are self guying and do not need to be guyed. That being said some additional strength can be gained with careful guying. It is important to set many guy lines (12 is definitely best) in order to spread the load between  multiple points. With less guy lines, it is possible that too much stress on one point will rip the clip all out of the covering, severely damaging your dome. Run a line from the clip cords as shown in drawings to trees, stakes, large rocks, or buried objects in the soil. Do not tie guy lines to the dome poles; the wind will pull out the poles from connectors. In high wind, check guys and anchors frequently, adding more if necessary. Even if you anchor your dome well, extreme wind can still rip the guy line clips off your cover and your dome will fail.
 Always incorporate a strong bungee cord into your guy lines. By “strong” we mean a bungee that you can just barely stretch when you pull on it with both hands. If you can’t find a strong enough bungee then you can tie a weaker one into a loop or join two or more bungees together. Tie one end each guy line to a bungee and then tie the other end of the bungee to a secure stake. This is important to give your guy lines a slight amount of give. A completely taught guy line will increase the chance of a clip being ripped out of the covering, damaging your dome. Be sure to hang strips of cloth, etc. to your guy-lines to avoid tripping hazards. Include a heavy-duty shock cord in each of your guy-lines so that the dome will have some give and take.
 How To Make Your Dome Even Stronger
If you expect a storm with strong winds, consider removing the lower 12 poles, leaving the dome anchored. Then run strings back and forth across the dome, going from stake to stake to keep the wind from lifting up on the covering. If the dome still appears to be buffeted excessively by the wind, remove the remaining poles and lash the covering to the ground again by running strings back and forth from the anchors. When the storm passes, put the dome back up.
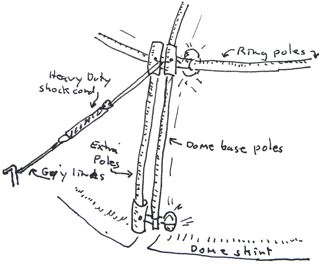
Another way to make your dome stronger in the wind is to add an additional set of “base poles” (12 extra poles for the 14′, 18′, and 20′ domes) (20 extra poles for the 30′ or 31′ domes). You will also need two “connectors” and two “clip cords” for each of your extra base poles so you can tie them tightly to the Grip Clips cords that support the existing dome’s base poles. This is best done with your dome set up. Tie the connectors tight to the Grip Clip cords above and below the domes base poles and then bend and insert your extra poles into these connectors.
You do not have to remove these connectors when you take the dome down. Just remove the extra poles by bending as you would any of the other domes poles. With your dome well staked out set guy-lines off of each the clip cords at the top of your base poles. Be sure to hang strips of cloth, etc. to your guy-lines to avoid tripping hazards. Include a heavy-duty shock cord in each of your guy-lines so that the dome will have some give and take.
Using this same approach an extra set of ring poles can be added for additional strength. Even though stronger, your dome can still fail: be sure to read our wind warnings below and “How to Deal with Wind and Snow“. Extra poles, connectors and clip cords can be found at our Accessory Page.
To increase load bearing is tricky. Our domes are designed to balance weight and strength, and also to be able to assemble and disassemble quickly with one or two people without tools. Using stronger materials would be possible, but at the expense of these other properties. The way the domes are constructed, the weakest link of the structure is the poles. Your dome can usually recover from pole breakage but not so easily from a clip ripping a hole in your dome’s covering.
Doors
Most of Shelter Systems’ domes come with 4 doors, equally spaced around the dome. BubbleDomes come with one door, 30′ with 8. For more information on 30′ and 31′ domes, see special instructions here.
 Adding Poles To Your Doors
A pole can be added to the lower edge of each door to hold the door tight and allowing the door to easily swing open and shut. To add a door pole, insert the pole into the two plugs attached to either side of the door panel. Not all domes include door poles.
To prop your door open, tuck the tip of the door pole under an adjacent horizontal pole. If you aren’t using a door pole, you can just roll the door panel up and tuck it over the pole above the door.
Hooking Doors Closed Using “S” Hooks
On either side of each door there is an “S” hook. For doors you are not using, you can hook both sides of the door. Or you can hook one side of a door, which allows you to easily swing open and closed the door. In strong winds, hook both sides of all doors to prevent doors from flapping open.
Removing The Fabric Strip At The Bottom Of The Doors
At the bottom of each door opening, there is a fabric strip that holds the door openings to the right length. For most uses, you will not need or want to remove the fabric strip, but in case it is in the way, it can be removed. To do so, remove the pole and stake connected to the clip holding the fabric strip, then unclip the clip, releasing the fabric strip then reattach the clip (see clipping instructions at the end of this manual). Avoid cutting the fabric strip because this will cause the dome’s base to spring out of place. If you move your dome, you will need to re-establish the spacing at the door by positioning stakes so that the door flaps overlap with door openings. The door openings are adjusted right when the doors are able to seal without a gap when closed.
Sealing Doors
You may want to seal your doors to keep out wind, dust, and cold. You can use binder clips, sticky back Velcro, or heavy-duty UV stabilized duct tape. The same technique can also be used to seal wall panels or the floor to walls.
Using Binder Clip to Seal Doors:
Your dome comes with a set of binder clips that can be used to close your doors tightly to the walls. Binder clips also work well for closing net doors. Binder clips hold best when you form a small overlap of the door and wall materials and clip them together. You can buy more binder clips at most stationary stores.
Using Sticky Back Velcro To Seal Doors
An alternative to binder clips is to use sticky back Velcro Strips or Coins.
For Strips: Make sure the netting and tent covering are clean and dry before applying the Velcro. One way to attach Velcro to your net doors is to first secure the net closed with the bottom clip hooks. Use a marking pen to mark where the edges of the netting contacts the sides of the tent. Lift up the net and get it out of your way. Now measure and cut a length of “hook” Velcro long enough to secure one of the door’s edges. Remove the protective strip from the sticky back and apply this Velcro to the inside of the mark you have made on the side of the dome. Repeat for other side. Take two lengths of “loop” Velcro and Velcro them to the “hook” Velcro that you have already attached to the sides of your tent. Remove the protective strips from these. Now carefully lower and hook your net door to the base of the dome. Press the netting to the exposed sticky of the Velcro. Rub well to secure the bonding of the glue to the netting and the sides of your dome. Attach sticky back Velcro on the door you use (apply when clean and dry – it takes about 24 hours for the glue on the Velcro to set completely).
For coins: Make sure the door covering and sidewall covering are clean and dry before applying Velcro coins. First secure the door cover closed with the bottom clip hooks. Cut free 4 or more Velcro coins of both hook and loops still attached to their backing. Stick these together. Now cut free one of the stuck pairs. Remove the protective strip from the sticky back of the hook side and apply the sticky side of this coin pair to the sidewall centered between the overlapped door and sidewall. Remove the protective strip from the loop side of the pair and allow the door to close onto the sticky side of the coin. Rub well to secure the bonding of the glue and the sides of your YurtDome. Repeat this with other coins along the overlapped door and sidewall to provide your desired degree of seal. The coin’s glue becomes stronger over a period of 24 hours.
Adding mosquito net doors:
If you ordered net doors with your original order, they are already installed and function just like your fabric doors. Or you can receive them unattached and you will have to install them yourself. To install a net door: tie the upper two corners to the dome clips over the door. There are holes on the interior of the clips on your dome for this purpose. Thread the string through one of these holes on each of the clips. Pull the string up as short as you can get it and tie in the net door.
Floors:
An earthen floor:
Most of us have lived our whole life in a house; so living on the ground does not come intuitively to us. We think living on an earthen floor would be wet, cold, and damp. However, if you choose your site carefully and prepare the earthen floor properly, the earthen floor will be drier, warmer and always much cheaper than building a wooden deck. An earth floor also does not require insulation since no cold air can circulate underneath your dome. Regardless of what type of flooring you choose to use, you should always line your floor with a waterproof covering, and you can make your dome cozy with carpet or rugs.
Waterproof floor coverings:
Always install a waterproof floor covering in your dome to keep dampness from the earth from entering your living space and condensing on your walls. A basic tarp works well, or Shelter Systems sells a circular, high-grade waterproof floorsmade out of our woven film that will fit your dome perfectly. The Shelter Systems’ floor comes with enough GripClips to attach it to the walls, or you can buy GripClips separately if you want to use your own tarp.
Start by making sure your dome is staked out tight and as close to a circle as possible (see section on positioning your dome). Spread out your floor evenly inside the dome. The floor should go up 4” to 6” inches up against the inside the dome walls. It’s very important that the floor does not go under the dome’s wall to the outside, if it does it will collect rain and inside your dome will get wet.
Securing your floor:
If you have a fair amount of stuff in your dome, you can weight the edges of the floor up against the walls to keep the floor tight and in place. Often this will be sufficient to keep your floor in place, but you may want to add a Grip Clip at each side of the door that you use as a main entrence. This will of hold the floor tight against the foot traffic of entering and exiting.
Here’s how to attach a floor using the Grip Clips included with an ordered floor. You can also use this approach to attach a floor that you make from a blue tarp. It takes about 30 minutes to tie in your floor with Grip Clips. Your floor when tied right will be tight and smooth, without wrinkles.
1) Pick a windless day as you may need to loosen some of your stakes to access the inner half of the Grip Clips that your stakes are attached to. Start by making sure your dome is staked out in a tight and even circle. Spread the floor out evenly inside the dome. The edge of the floor should go up 4 to 6 inches against the inside walls
2) Attach cords to each of the male parts of clips you will use to attach your floor by knotting one end of the cords that came with them and slipping the other ends of the cords through one of the holes in these male clips.
3) Pick out two inner dome wall clips that are each 1/2 way around the dome. Attach a Grip Clip to the floor about 2″ from one of these dome’s ground clips such that the male part of the clip, with it’s attached cord, faces the ground. Feed the end of this cord through the male part of the dome’s ground clip on the inside of your dome. To do this use a paper clip, or the like, to loop around the cord and pull the cord out of the larger center hole of the clip; then pull it tight and tie a knot in it to hold the floor to the dome. Now go to the opposite side of the dome, pull the floor tight and attach and tie the second floor clip to the dome. Your floor should now be tensioned from one side of the dome to the other.
4) Next do the same for the two clips that are midway between the two that you have just done. Now finish up by proceeding in this same manner to attach and the remaining 8 clips. This should provide you with a tight, flat and even floor. Be sure to stake out your dome tightly after you are done.
Using sticky-back Velcro to secure your floor:
Sticky back Velcro can be used to create a tighter seal of the floor to the wall. Make sure the floor and tent covering are clean and dry before applying the Velcro. UV stabilized tape can alternatively be used.
First secure the floor to the walls of your tent as described above. Then use a marking pen to mark where the edge of the floor contacts the sides of the tent. Move the floor to get it out of your way. Now measure and cut a length of “hook” Velcro long enough to secure one of the floor’s edges. Remove the protective strip from the sticky back and apply this Velcro to the underside of the mark you have made on the side of the dome. Repeat for other sides of the floor. Take lengths of “loop” Velcro and Velcro them to the “hook” Velcro that you have already attached to the sides of your tent. Remove the protective strips from these. Now carefully lift and hook your floor to the sides of the dome. Press the floor to the exposed sticky of the Velcro. Rub well to secure the bonding of the glue to the floor and the sides of your Yurt Dome. It takes about a day for the glue on the back of the Velcro to completely set.
In strong wind we have found that tucking the domes skirt under the floor and then weighting down the floor particularly on the windward side so as to pinch the floor to the skirt and thereby to the ground helps to keep out the wind. Duct tape or sticky back Velcro is valuable in further sealing the floor’s edge to the wall of the dome.
Keeping your floor even:
Over time, you may notice lumps and bumps developing in the earth under your floor. Instead of removing the whole floor and starting over, you can unclip half your floor at a time; this will help retain the overall shape and tautness of your floor. Unclip half your floor and pull it up to expose the earth underneath. Use a shovel to remove lumps and bumps and fill in dips and holes. Re-clip that half of the floor and do the other side. You may need to repeat this in another couple of weeks, as the earth settles, but soon you will have an well packed earth floor that is level, comfortable, and with good drainage.
Decks:
A wooden deck is an alternative to an earthen floor and is a better option in some situations, such as on a steep slope, on very rocky or volcanic earth, or if you want to elevate the dome. There are many ways to build wooden decks, but if you are not comfortable with carpentry, consider getting help and a good book on deck construction. A poorly built deck might not function properly and can cause water to enter your living space.
We suggest you start by making your deck one foot bigger than your dome’s diameter. Then set up the dome on your deck and position it how you want it. Trace around the perimeter of your dome onto the deck. Remove the dome and cut the decking along the line you marked, but not through the joists that are under the decking. Because poles of the repositioned dome will not align exactly with the protruding joists, you will need to cut some 2″x 6″ supports for the poles to sit on. (Measure the distance between each pair of joists under the cut deck.) Now secure the measured sections to the joists. Place the dome back on the deck and anchor your dome with “eye” bolts to the 2″x 6″ sections. Now, rain running off the dome will run onto the 2″x 6″s that you have attached under your deck and not onto the deck and into your dome.

Here a way to construct a deck for a 20′ dome built of 2″x 6″ Douglas fir and plywood. It has 12 equal sides. The spacing for the joists is 2′. Use joist hangers. Support underneath with 4″x4″s toe-nailed into foundation piers placed under each joist’s ends and several under the central joists. Extend the dome’s skirt (with plywood or plastic) to the ground to block cold air from coming up under the dome.
Keeping Cool
Do not set your dome under a tree or branch that might fall. Use one or more of Shelter Systems’ SunShades (see below) or 80% shade cloth. WARNING: DO NOT COVER SHELTER WITH A TARP. A tarp can fill with rain and collapse shelter. A tarp will trap heat and cause the poles to deform. Do not cover your dome with anything except a single layer of our Sunshade. In hot weather keep all your doors open, preferably without the netting (if bugs are tolerable), since the net slows the airflow. Turn the dome so the doors face towards the prevailing breeze and with more than one door open, you should get a good cross wind.
Using Vent Tubes 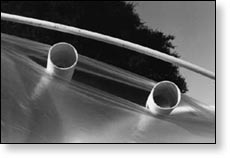
For excellent upper ventilation, use the included vent tubes. Insert the vent tubes between overlaps in shingles. The tautness of the fabric will grip and hold them, and create a gap for hot air to escape. The more you open up your dome to airflow, the cooler and breezier it will become. You can secure the vent tubes against wind with a binder clip. You can also use other light objects, like empty soda cans.
If insects are a problem, you can use sticky back Velcro to attach a strip of netting approximately 18″ by 5′ to the inside of the upper shingle of tent fabric where you plan to place your Vent Tube. Do this so that the netting hangs down on the outside of the Yurt Dome’s cover. Then when you insert the Vent Tube the netting will cover the opening and protect the interior from insects. If and when the bugs are not a problem you can un-Velcro the net and store it. In windy conditions you can use sticky back Velcro to attach the hanging part of the net to the lower shingle. Make sure the netting a tent covering is clean and dry before applying the Velcro.
Open Arch Form of Your Dome
See web page on open arch form of yurt domes: https://shelter-systems.com/arch-domes.html
You can create a large cooling opening by setting up your dome in an open arch form. First set up and stake out your dome. Do so by removing the poles and stakes from under one of the arches; remove the poles under the arch; roll and tie up the canopy to the arch. You will first need to undo one Grip Clip from the strip at the base of two adjacent doors, and then apply the Grip Clips back onto the dome Attach cords (about 2′-3′ long) to the inside of each of the clips along the arch. Have several people help you roll up tight and hold the dome’s covering under the arch. Using the added cords tie up covering to the out side clips along the arch.. This dramatically increases ventilation since it opens the interior space of your dome to the outdoors, but note that it will also weaken the dome in the wind. An open arch dome also makes a wonderful inviting opening for public events.
To set up the BubbleDome in an open arch form: The BubbleDome has only one door therefor you will need to remove two clips to make another door at the other end of the arch. Then reattach them with their connectors to the dome’s side (this is so that the arch pole can be reinserted). Now the covering under the arch is free to be rolled and tied up, creating an open arch form.
To set up the 31′ dome in an open arch form: Un-stake the stakes between two adjacent doors. Remove the poles under the arched pole that connects the two doors. Un-clip the “door strip” at the base of these two doors by removing a clip to the side of each door (replace the clip so it will not get lost). Attach cords (about 2′-3′ long) to the inside of each of the clips along the arch. Have several people help you roll up tight and hold the dome’s covering under the arch. Using the added cords tie up covering to the out side clips along the arch.
Sunshades:
Shelter Systems offers sunshades in porous black or silver. Do not cover your dome with a tarp as it will trap heat and melt your poles or catch water and collapse your dome. Our sunshades are great for keeping your dome cool because the space between the dome and sunshade allows airflow and the heat that’s absorbed by the sunshade to dissipate. The sunshade comes with clips and cord.
 To install sunshade: Attach cord to the ring part of the 4 Clips and attach one to each of the corners of your sunshade.Tie the cord from one corner of the sunshade to the dome. Hold on to the cord at the opposite corner of your shade and walk around the dome, pulling the shade over the dome. Tie all corners of the sunshade to the dome.
It is important to keep your sunshade tight against the dome’s poles, since you need that cooling airspace between the shade and the dome. If over-heating is likely to be a problem, consider two or more sunshades. Arrange shades such that they do not overlap each other. The airspace under the shades and the gaps between the shades will allow heat to be dissipated and escape rather than be reradiated back into your dome.
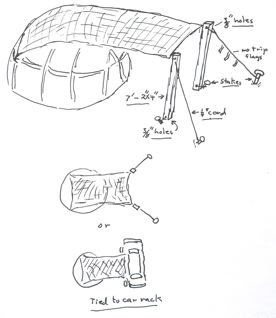
You can also attach one of our sunshades to your dome, pull it out and tie it to your car’s roof rack. This will make a shaded porch area that you can cook, eat and sit under and out of direct sun.
WARNING: DO NOT COVER SHELTER WITH A TARP, PARACHUTE OR ANYTHING OTHER THAN A SINGLE LAYER OF OUR SUNSHADES. A tarp can fill with rain and collapse your shelter. A tarp will trap heat and cause the poles to deform. Do not overlap sunshades.
Staying Warm
Shelter Systems’ domes can be quite comfortable in winter and cold climates. Some things can be done in order to maximize comfort and warmth in cold weather. Remove the sunshade if you are using one, in order to let in the sun’s warmth. You can use a propane heater, an electric radiator heater, or a wood stove to heat your dome. Take precaution that all heat sources are kept away from the dome walls. A full interior liner with windows is available from Shelter Systems, which will increase the warmth of your dome.
WARNING: For use of your dome in snow, accumulated snow must be melted or shaken off periodically. Accumulated snow could collapse your dome, damaging what you have stored inside or compromising your shelter.
Wall Liner: 
A liner reduces heat loss from radiation, conduction and convection, and creates an insulating dead air space of 2″-3″. A liner also helps prevent the condensation that may build up in very cold weather. A more permanent option for very cold weather is to use rigid foam insulation (can be purchased at many building supply stores) between the liner and the dome walls. You would cut the foam insulation in the same geometric shapes as your dome’s panels and insert it panel-by-panel as you install the liner. Although foam insulation is not necessary in order to be comfortable in your dome, or for that matter even a liner, you will use less fuel and will experience a more even inside temperature with a liner installed.
Installing your liner:
The interior wall liner is installed after your dome is set up and staked out. Unroll the liner inside the dome. Locate the liner’s center top clip (marked with a ribbon). Tie the string of this center clip to the top center ceiling clip of your dome by threading the string into one of the two holes and pulling the string back through the big center opening in the domes inner clip. This is easiest to do if you use a tool like a crochet hook, paper clip or a needle nose pliers to grip and pull the cord through.
Pull the string as tight as you can without deforming the dome’s outer cover and knot it in place. Pull cord tight then create a knot in the cord itself. The idea is to shorten the cord pulling the liner reasonably tight against the outer covering. The liner should be about 2 to 3 inches from the outer covering. A simple overhand knot will suffice. Rotate the liner until it’s doors line up with the doors of the dome. Now proceed to work down from the top, stringing up and knotting the clips. Be careful not to miss any clips since it is hard to reach them later on. You will want your liner to be nice and tight, so if you need to, remove the lowest clips at the liner’s edge higher up on the liner before tying it in. Simply unclip them and re-clip them back on a little higher on the material, adjusting the tension.
Stove installation:
Place your stove a safe distance from the dome wall on a certified fireproof mat or bricks. When deciding what height to have your stovepipe going through the wall, keep in mind all stovepipes must be at least 18 inches from any dome pole, otherwise they will melt. This means your horizontal stovepipe must be low enough, as well as long enough to keep the vertical sections of pipe a safe distance from the poles Use insulated stovepipe.
Here is one way to install a wood stove using a plywood panel. Check for local codes in installing and using stoves. To do this, roll up one of the doors and tie it so it stays safely out of the way. Cut a piece of plywood that is the same shape as the door opening, but slightly bigger by about 2″ on each side for a tight fit, such that the sides of the door openings overlap the outside of the plywood. Drill a small hole at the top of each upper corner. Shingle this in place by propping it into the door opening with the top edge inside the dome and the bottom edge outside the dome. Tie the upper two comers to the nearest interior clips as you would a liner (above). You can if you want attach the door opening sides to the plywood with 1″ by 1/4″ strips of wood nailed or stapled over the overlap of the door opening. You should use 3/8″ to 1/2″ plywood that’s made with exterior grade glue so that it holds up well when wet.
Safe use of a stove inside a dome:Keep all flames and heat away from your dome’s covering, poles, and other objects in your dome. Only use insolated pipe, elbows, stove jack, and pipe fittings. If possible, have your stovepipe come out the back of your stove and pass through the plywood wall. If your stovepipe exits your stove at the top then place an elbow bend as close to your stove as possible. Attach a horizontal section of pipe to your stove so that the pipe will slant slightly down towards the outside. This will keep rain from following the pipe in and drip inside your dome. Place an elbow bend on the stovepipe on the outside of your dome, and support it with galvanized steel wire attached to steel pipes to support and stabilize the pipe outside the dome. Loop wire also around the elbow so it supports the weight of the horizontal pipe. The wires should be tight enough to lift the horizontal pipe so that it is centered through the hole in the wall and not touching the fabric. Local codes may require other installation procedures. Use only insulated stovepipe and fittings. Follow carefully the instructions that are provided with your stove. You will want to place your stove and pipes so they are not so close to the dome’s covering, floor, objects inside your dome or its pipes such that that they would melt or be damaged. As to a heat shield, follow the instructions that came with your stove.
Carefully follow the instructions that come with your stove or heater. Use a vented heater so that combustibles are expelled smoke and gasses from heater to the outside of your dome. Water is a byproduct of all fuels are burnt, which can cause water vapor adding to dampness in your dome, and more importantly, most heaters can produce carbon dioxide and/or carbon monoxide, both of which are highly dangerous and can be deadly. There are some indoor heaters that claim to be safe to use without ventilation. Read and follow their instructions carefully.
Warning about using a stove in your dome: Do not make your dome airtight as you would suffocate. To prevent carbon monoxide poisoning, do not use an fuel consuming appliances, heaters, or stoves without venting the fumes to the outside of your dome. Leave a crack in the door as combustion devices consume oxygen.
Rain Collection System:
The flap of the shingles that circle the dome at about 5’ high can be tucked into a gutter system in order to direct rain into a rain collection system. There are businesses that specialize in making custom gutters (check online for one in your area), or if you are handy, you can fashion one yourself.
You can make a gutter out of metal or fabric. It should hang from the 12 clips that circle the dome under the ring pole of about 5’. We recommend a narrow gutter of about 2/5” to 3”, so the gutter fits under the dome’s pole system. Each of the 12 gutter joints should be the same 150-degree angle. You will need a downspout and a storage tank for the water.
Another gutter system can be constructed using a long strip of watertight fabric such as a blue tarp material. You will want your tarp gutter to be about 18” in width, and long enough to go around the dome and then downward into a water storage vessel. A storage vessel can also be made from a tarp. Cut a circle from a tarp with a radius of about 8 feet, then gather the circumference of the circle around one of your vent tubes and tie it tight with some cord. Tie this tube to a clip of your dome at about 5′ high so the tube is about a 12″ off the ground. You will then need to start to attach your “gutter” to the 2″ skirt of your dome at the approximate height of 5′ and circle the dome so as to create a gutter of tarp material on both sides of this 2″ skirt that starts at with a gutter that is only 3″ deep and ends with the gutter being 9″ deep once it is all the way around the dome. One way to attach the “gutter” is to use 3″ by 1/8″ by 1/8″ sharpened slivers of wood as pins to pin the tarp cutter to this 2″ skirt. The gutter then should be formed into a tube and directed down into your water storage “bag”.
A length of tubing can be inserted into the water storage bag or tank to syphon water when you need it. Be careful to prevent small rodents from gaining access to your water as they may drown and pollute your water. You should filter and purify collected water before using it (do an online search, one that may be relevant: http://www.baproducts.com/rainwatr.htm).
Dividing your dome into “rooms”:
Shelter Systems’ domes can easily be divided into rooms using fabric, tarp, or the woven ripstop material that we make the dome from. First decide how many rooms you want. Here we describe how to divide your dome into halves and quarters, but you can use the same principle to divide your dome however you want.
- Get enough fabric, if you plan to divide your dome into halves, get (or sew) a 6-foot wide piece of material with a length equal to the exact diameter of your dome (for example, for a 14’ dome, get a piece of material 6-feet wide by about 14-feet long). Make sure to measure the exact diameter of your dome, as it can slightly vary based on how exact a circle your dome is after you put it up and staked it out. If you want to divide your dome into quarters, you will need two pieces of this size.
- Purchase enough Grip Clips needed to attach the divider material to your dome. For halves, you will need 7 clips.
For quarters, you need 14 clips. - Fold the divider material in half and make a small mark at the crease to mark the center. This will be point E.
- Attach Grip Clips to points A and tie them in to the bottom clips of your dome.
- Attach a Grip Clip to point E on the divider material and run a cord from the top/center Grip Clip of the dome. The material should now be taught between the three points, but not overstretched which can cause wrinkles or gaps at the floor.
- Attach Grip Clips to points B and tie them in to side clips of your dome. Make sure the material is taught but not overstretched.
- Attach Grip Clips to points C and run a cord from them to points D. Make sure the material is taught but not overstretched.
If you want to divide your dome into quarters, use a piece of material the same size + 12″ (this allows for overlap in the center), cut it in half, and following the above sequence, attach it into the dome after you have divided it into halves. Alternatively, you can make the divider in half sections that are clipped in the middle with two tie clips down the joined edge. There are two advantages to this configuration. One is that it saves some fabric since we can cut two halves so that one is flipped and nestled next to the other. The other advantage is that the tied closed seam could act as a door to get from one half to the other.
Hanging decoration, dividers, or net doors inside your dome: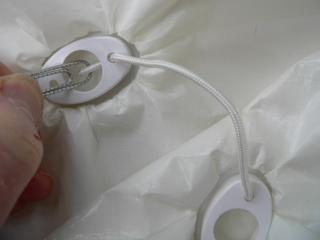
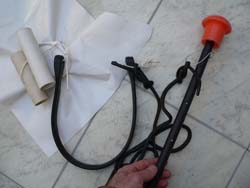
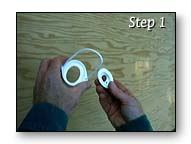
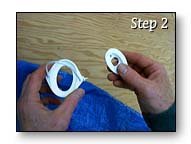
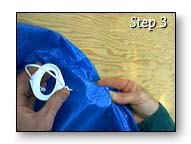
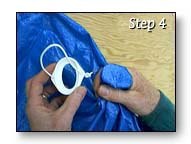
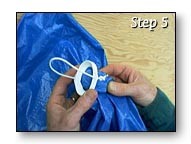
You can hang decorations, dividers, or nets inside your dome’s walls using the holes in the interior of the covering’s clips. You will find a small bent piece of wire or a large paper clip helpful in threading the cord from the accessory clip to dome covering clip.
See photo: the clip at upper left is the inside of the clip of the dome covering; the clip at lower right is the accessory clip with cord attached. The paper clip is being used to pull the accessory’s cord through the dome’s inner clip hole. The cord is then knotted. Although the threading can be done with out a wire or paper clip, you will find it helpful.
Attaching door-to-door connection strips:
You can join two domes together using a connector strip of material that will attach two doors tight and create a gutter between them to redirect water to the base outside the two domes. You will need: a strip of material (for 18’ dome, you need a 3′ by 16′ strip), 8 Grip Clips, 8 clip cords. This strip when attached properly will join two dome doors tightly and create a gutter between them that redirects water to the base outside the domes.
- On a windless day, set up the two domes next to each other such that two doors are facing each other.
- Roll up and tuck the door coverings over the poles at the top of the doors.
- Move the domes together so that the bases of the door openings touch each other.
- Anchor your domes in place, carefully following carefully instructions in this manual to secure your dome to the ground.
- Make a knot in the end of each cord. Feed the un-knotted end of the cords through the concave side of each of the smaller “button” halves of the clips
- Attach two clips to the center end of the connection strip about 8-inches from the end of the strip. The clips should be about 4 inches from the end
- Go inside one of the domes, and lay out the connection strip under the two door openings so that the button clip cords are off to one side and centered in the door way. The cords should be facing up, and be close to one of the sides of the door openings.
- Slip and tie tight one of the connector clip cords through the clip hole at the base and inside the doing closet to that clip. Repeat with the other button clip cords inside the other dome.
- The domes is now be joined together by the connector strip.
- Keeping the connector strip tight, apply two clip to the connector strip so the button cord is on the same side of the strip as the first two clips, and such that when these two clips are tied to the inside upper clips of the two, they pull the connector strip tight and centered. You may need to remove and reposition these two clips to get the connector strip tight, centered and even.
- Next do the same for the next two doorway clips. Keep the strip centered and tight.
- Secure the remaining two base clips. The connection strip should now be secured tight to the walls inside both domes creating an air closure and watertight connection.
- You may carefully trim excess material from the strip.
- If your soil does not drain well, make a ditch around your dome to direct water away from the domes.
- If you want to make more connection strips, you can remove this one and use it as a pattern.
Attaching a Shelter Systems’ Porch:
A porch is an excellent addition to a  dome, and can be easily attached in minutes to any of our domes. A porch can be used to keep your dome dry if you want to leave a door open in a warm rain, space to take off a raincoat or boots before entering your dome, or for hanging wet gear underneath it to dry.
Shelter Systems sells a porch that’s made to fit your dome, or you can make one yourself out of a tarp, poles, and Grip Clips.
The standard porch covering is a 5 feet by 5 1/2 feet arched square made out of our translucent woven ripstop material for maximum light transmission. Porches can also be special ordered in other materials, including white for less light transmission or white/black for maximum shade.
 If you ordered a porch along with your dome, you’ll find the two porch support poles taped together. The support poles are the same length as the dome poles but have a hole drilled in each end. Find also 16 poles that are a smaller diameter and shorter than your dome’s poles. Spread your porch cover out on the ground so the connectors are facing up, and insert porch poles into connectors.
Attaching a vestibule:
To attach a vestibule to your dome’s door you will need a tarp who’s length is equal to three times the height of your door and eight Grip Clips. Roll and tie up one of your doors. Match the center edge of your tarp with the approximate center of your door opening’s top. Attach one clip to each side of this center on the tarp so that the clips match with two clips on the top of your door opening. Now tie these to the clips tight to the inside of the door opening. This will maintain the waterproof shingling of the dome. Next pull out the tarp to create the type of vestibule or porch you desire. Attach one or two clips where desired to the pulled out edge and secure these to anchors. Now pull down the edge of your tarp to tension the sides, attach clips and tie to the inside of the door’s opening at the base.
Storage:
Your dome can be disassembled in minutes, and wrapped up into a compact package for easy storage and transport. Make sure your dome is completely dry and brush off as much dirt as you can. If you have taken down your dome when wet, plan to hang dry it from the top-most clip until completely dry before packing.
Remove all stakes, vent tubes, and poles. If you are using a liner in your dome, it can remain attached. We recommend you package the dome covering and floor together as one bundle, and the poles as another bundle. We’ve found the following technique for folding easiest and yields the most compact package.
1. Lay the dome covering on it’s own floor to keep it clean
2. Put the a stake in the ground to use as an anchor during folding
3. Hook the cord from the top-most clip on the stake
4. Pull all the dome’s edges so that it fans out and lies flat, one half on top of the other half
5. Pleat-fold it so that the canopy forms a narrow triangle 4′ wide at the base. Try to get each fold as flat as possible.
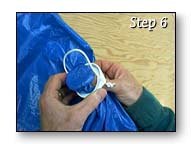
6. Slip the tip of the triangle (top-most clip) off the stake now and begin rolling it tightly down toward the wide end until you’ve got a nice bundle
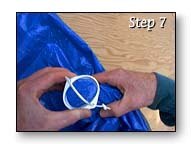
7. Clean and dry both sides of the floor, then fold it into a 4′ wide strip
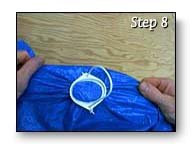
8. Lay the tent roll and other small parts at one end and roll the whole thing up tightly
9. Wrap your dome in the material that it was shipped in, and use cord to hold the roll tight
10. Now tie the poles into a bundle. To get it nice and tight, wrap string twice around the bundle of poles and use a packer’s knot (a kind of slip-knot that holds tight – illustrated below). If you don’t know how to make a packer’s knot, you can use other types of knots or bungee cords.
In order to make an even more compact package,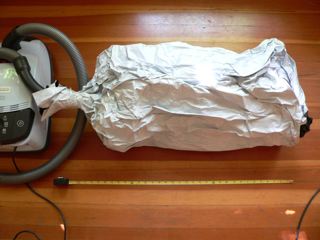 you can use a regular house vacuum to compress your packed dome. This will reduce your bundle to about 1/2 its volume. Roll and pack up your dome as above, seal the long seam and any holes of the wrapper with tape, twist one end tight and then fold and tape the twisted end to the package (this is to make an airtight bundle). Insert your vacuum hose in the other end, twist and tape it tight. Turn on your vacuum and push down on your bundle and it will compress. With the vacuum still on wrap package tight with a generous amount of tape to hold it in its compressed form. Now remove your vacuum hose.
Repairs: 
Your dome is designed to be durable and problem free. However, some of our customers have used their structures for so many years that eventually they need to make some minor repairs or need replacement parts.
Broken Poles:
Broken poles can be repaired with a wooden insert such as a piece of broom handle or a straight stick. Replacement or extra poles can be ordered through Shelter Systems or bought at most building supply or plumbing stores. Ask for PVC class 200 or class #125.
Broken connectors
Broken connectors can be replaced with class 200 PVC (1-1/4″ for the 20′ and 18′ domes and 1″ for the 8′, 10′, 11′, and 14′ domes).
Repairing small holes: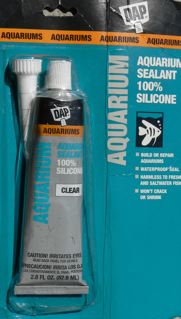
The simplest way to repair a hole or cut in the covering is to cut a patch from the material the dome came wrapped in. Use 100% silicon rubber to glue your patch on the outside of the tear. If the tear is small you may be able to plug it up with a blob of silicon rubber alone. Silicon rubber glue is readily available at hardware stores.
Repairing larger tears or holes:
If you have a larger tear or a tear that is immediately adjacent to a clip, you can make a repair from a patch cut out of either material at the skirt of your dome or cut out of the material that your dome was wrapped in for shipping. Use a patch of about 12” square, as long as this is sufficient to cover the tear with at least a 2” overlap on good material. This is important, as it allows the stress that the clip generates to be spread over a large number of stitches. Sew in your patch using stitches about 1/8” long with doubled cotton-covered polyester button thread. You don’t need to remove the torn section of the covering. Preferably, you should glue the patch in place first with 100% silicon rubber bathroom caulk, which will make the sewing easier and provide a better seal. If you do this, press the glued patch between two heavy objects (like large books or rocks) and wait until the glue is completely set, about 12 hours. Make sure the covering is clean and dry before gluing. After you set up the shelter, you can apply Silicon Rubber to seal the seams and along the edge of the patch.
Another way to do this is take the dome down; locate the damage; remove the grip clip (you can brake the clip off with pliers if you have a replacement clip; label with a making pen the order and orientations of the layers of panels; cut and sew by hand or machine a patch to replace the damaged area (use strong thread and 1/8″ stitching); mark and trim patch to size; re-layer (in the right order and orientation) the panels; attach the clip (best to first practice “clipping” till you can clip 3 to 4 layers); proceed to next area; set up dome; use 100% silicone rubber caulk to seal seam with dome up (this way seam is tensioned and glue sets to seal needle holes).
Alternatively you can replace a whole panel if a tear is immediately adjacent to a clip. You can order a replacement panel from Shelter Systems. Arrange the replacement panel over top of the damaged panel so that it is in the same orientation. Remove only one clip from your dome being careful not to disrupt the layering sequence of the panels on your dome. If you cannot get the clip off use a pliers and break the ring part of the clip (you will receive 6 extra Heavy Duty Grip Clips with each replacement panels). Take your time to carefully slide out the corner of your damaged panel and insert your replacement panel into the same layering sequence as that of the damaged panel. With all layers in the same order and orientation as before; gather these tightly around the male clip and slip over the female clip as described below. When many layers are involved (as is the case with corners and windows), attaching the female clip can be difficult; try. Practice on scraps first. Making the layers warm with the sun or very hot water can help in attaching clips easier.
A303 Aerospace UV Sun Protectant
Originally engineered for aerospace and aviation applications, 303 Aerospace Protectant is a premium surface treatment that instantly beautifies and provides superior protection against harmful UV rays that can cause discoloration, fading, embrittlement, cracking and/or chalking of surfaces.303 Aerospace Protectant also repels dust, dirt, lint, soiling, staining, water spots, salt water and mildew. Safe and effective for vinyl, clear vinyl, gel-coat, fiberglass, carbon fiber, synthetic/natural rubber, plastics and finished leather. Available online.
Attaching Grip Clips
Here are directions for attaching Shelter Systems’ Grip Clips. Removing is the reverse.
Attaching Grip Clips™:
- Choose a set of two “halves” of a Grip Clip
- Select the section of tarp you want to secure with the Grip Clip
- Wrap material over smaller button half with its flared side facing up
- Slip button (wrapped with tarp) through ring
- Rotate the ring so that the button seats snugly into the locked position.
Removal of a clip is just the reverse procedure.
Patented and others pending. shelter-systems.com